着色器
将 3D 模型导入 PlayCanvas 时,默认使用物理材质,这种通用材质能满足许多渲染需求。
但特殊效果或材质特殊情况通常需要编写自定义着色器,此时应使用 ShaderMaterial。
创建 ShaderMaterial 实例的步骤如下:
先创建着色器描述:
const shaderDesc = {
        uniqueName: 'MyShader',
        vertexGLSL: `
            // write your vertex shader source code in GLSL language
        `,
        fragmentGLSL: `
            // write your fragment shader source code in GLSL language
        `,
        vertexWGSL: `
            // write your vertex shader source code in WGSL language
        `,
        fragmentWGSL: `
            // write your fragment shader source code in WGSL language
        `,
        attributes: {
            aPosition: pc.SEMANTIC_POSITION,
            aUv0: pc.SEMANTIC_TEXCOORD0
        }
    };
再创建可用于渲染的材质实例:
const material = new pc.ShaderMaterial(shaderDesc);
目标为 WebGL2 或 WebGPU 时可用 GLSL;仅 WebGPU 时可用 WGSL,也可同时提供两种语言。
GLSL 由 WebGL2 直接支持;在 WebGPU 上则需通过 WASM 转译器转换为 WGSL。为避免转译步骤、获得原生编译性能并免去额外 WASM 下载,可为 WebGPU 编写等价的 WGSL 着色器,由平台直接支持。
前向渲染中引擎提供的相机矩阵、屏幕和视口尺寸等值,参见内置着色器 uniform。在材质、网格实例或全局设置 uniform 值,参见着色器参数。
预处理器
着色器使用前会进行预处理,以高效管理变体。
预处理采用类似 C 的结构,处理 #define、#if、#else、#endif 等指令,让你精细控制代码如何编译及适配不同用途。
也可用 #include 包含已注册的着色器代码块,例如 #include "screenDepthPS"。
材质着色器宏
可逐材质设置着色器宏,动态定制行为。例如:
material.setDefine('USE_TEXTURE', true);
material.setDefine('FIRETYPE', 'RED');
这会将以下行添加到源码:
#define USE_TEXTURE
#define FIRETYPE RED
随后可在着色器条件逻辑中使用这些宏:
#if defined(USE_TEXTURE)
// Apply texture-based rendering
#endif

#if FIRETYPE == RED
// Apply red fire effect
#endif
无需维护多个着色器文件,就能灵活生成变体,方便为不同材质定制渲染。
着色器通道宏
引擎自动提供一些宏,方便集成着色器通道。常用内置宏包括:
// Defined for normal forward shader passes rendering colors
#define FORWARD_PASS

// Defined for shadow shader passes
// Shader output specifics may depend on the shadow type used
#define SHADOW_PASS

// Defined for the shader pass used by the `Picker` class to render mesh instance IDs
#define PICK_PASS

// Defined in addition to PICK_PASS when picker depth support is enabled
#define DEPTH_PICK_PASS
通过 CameraComponent.setShaderPass 配置自定义通道时,会自动生成对应宏。例如:
camera.setShaderPass('custom');
这会添加以下宏:
#define CUSTOM_PASS
着色器包含文件
引擎将小型着色器函数代码块组合成完整着色器。这些代码块也可在 ShaderMaterial 的自定义着色器中使用,便于集成引擎功能。
顶点着色器
引擎提供处理常见变换、法线计算等基础操作的预定义包含代码,让自定义着色器自动支持蒙皮、变形和实例化。
例如:
- GLSL
- WGSL
// Includes transformation-related functionality provided by the engine.
// - Automatically declares the `vertex_position` attribute.
// - Handles skinning and morphing if necessary.
// - Adds the following uniforms:
//   - `matrix_viewProjection`
//   - `matrix_model`
//   - `matrix_normal`
// - Provides utility functions:
//   - `getModelMatrix()`
//   - `getLocalPosition()`
#include "transformCoreVS"

// Includes normal-related functionality provided by the engine.
// - Automatically declares the `vertex_normal` attribute.
// - Handles skinning and morphing if necessary.
// - Provides utility functions:
//   - `getNormalMatrix()`
//   - `getLocalNormal()`
#include "normalCoreVS"

void main(void)
{
    // Retrieve the model matrix, accounting for skinning, morphing, or instancing.
    mat4 modelMatrix = getModelMatrix();
    vec3 localPos = getLocalPosition(vertex_position.xyz);
    vec4 worldPos = modelMatrix * vec4(localPos, 1.0);

    // Retrieve the normal matrix and compute the world normal.
    mat3 normalMatrix = getNormalMatrix(modelMatrix);
    vec3 localNormal = getLocalNormal(vertex_normal);
    vec3 worldNormal = normalize(normalMatrix * localNormal);

    // Example: Apply simple wrap-around diffuse lighting using the world normal.
    brightness = (dot(worldNormal, uLightDir) + 1.0) * 0.5;

    // Transform the geometry.
    gl_Position = matrix_viewProjection * worldPos;
}
// Includes transformation-related functionality provided by the engine.
// - Automatically declares the `vertex_position` attribute.
// - Handles skinning and morphing if necessary.
// - Adds the following uniforms:
//   - `matrix_viewProjection`
//   - `matrix_model`
//   - `matrix_normal`
// - Provides utility functions:
//   - `getModelMatrix()`
//   - `getLocalPosition()`
#include "transformCoreVS"

// Includes normal-related functionality provided by the engine.
// - Automatically declares the `vertex_normal` attribute.
// - Handles skinning and morphing if necessary.
// - Provides utility functions:
//   - `getNormalMatrix()`
//   - `getLocalNormal()`
#include "normalCoreVS"

@vertex
fn vertexMain(input: VertexInput) -> VertexOutput
{
    var output: VertexOutput;

    // Retrieve the model matrix, accounting for skinning, morphing, or instancing.
    let modelMatrix: mat4x4f = getModelMatrix();
    let localPos: vec3f = getLocalPosition(vertex_position.xyz);
    let worldPos: vec4f = modelMatrix * vec4f(localPos, 1.0);

    // Retrieve the normal matrix and compute the world normal.
    let normalMatrix: mat3x3f = getNormalMatrix(modelMatrix);
    let localNormal: vec3f = getLocalNormal(vertex_normal);
    let worldNormal: vec3f = normalize(normalMatrix * localNormal);

    // Example: Apply simple wrap-around diffuse lighting using the world normal.
    output.brightness = (dot(worldNormal, uniform.uLightDir) + 1.0) * 0.5;

    // Transform the geometry.
    output.position = uniform.matrix_viewProjection * worldPos;

    return output;
}
片元着色器
引擎提供伽马校正、色调映射和雾等常见颜色处理代码块。包含它们可确保颜色按渲染设置正确处理。
使用示例:
- GLSL
- WGSL
#include "gammaPS"       // Adds support for gamma correction of inputs and outputs
#include "tonemappingPS" // Adds support for tone mapping
#include "fogPS"         // Adds support for fog effects

void main(void)
{
    // Evaluate color in linear color space
    vec3 colorLinear = ...;

    // Apply fog if enabled
    vec3 fogged = addFog(colorLinear);

    // Apply tone mapping if enabled
    vec3 toneMapped = toneMap(fogged);

    // Apply gamma correction and output the final color
    gl_FragColor.rgb = gammaCorrectOutput(toneMapped);
    gl_FragColor.a = alpha;
}
#include "gammaPS"       // Adds support for gamma correction of inputs and outputs
#include "tonemappingPS" // Adds support for tone mapping
#include "fogPS"         // Adds support for fog effects

@fragment
fn fragmentMain(input: FragmentInput) -> FragmentOutput
{
    var output: FragmentOutput;

    // Evaluate color in linear color space
    let colorLinear: vec3f = ...;

    // Apply fog if enabled
    let fogged: vec3f = addFog(colorLinear);

    // Apply tone mapping if enabled
    let toneMapped: vec3f = toneMap(fogged);

    // Apply gamma correction and output the final color
    output.color = vec4f(gammaCorrectOutput(toneMapped), alpha);

    return output;
}
这些函数按引擎设置自动配置,保证不同渲染条件下颜色处理一致。
更完整的示例及实例化实现细节,参见引擎示例。
阴影通道
要让使用自定义着色器的网格投影,片元着色器必须在阴影通道输出适合当前阴影类型的数据。定义 SHADOW_PASS 时,包含引擎的 shadowCasterPS,将 getShadowOutput() 返回值写到输出颜色:
- GLSL
- WGSL
#ifdef SHADOW_PASS
    // Provides getShadowOutput(), which returns the data for the shadow type being rendered
    #include "shadowCasterPS"
#endif

void main(void)
{
    #ifdef SHADOW_PASS

        // output shadow data (alpha-tested materials can discard before this)
        gl_FragColor = getShadowOutput();

    #else

        // normal color rendering
        gl_FragColor = ...;

    #endif
}
#ifdef SHADOW_PASS
    // Provides getShadowOutput(), which returns the data for the shadow type being rendered
    #include "shadowCasterPS"
#endif

@fragment
fn fragmentMain(input: FragmentInput) -> FragmentOutput
{
    var output: FragmentOutput;

    #ifdef SHADOW_PASS

        // output shadow data (alpha-tested materials can discard before this)
        output.color = getShadowOutput();

    #else

        // normal color rendering
        output.color = ...;

    #endif

    return output;
}
阴影渲染使用同一顶点着色器,因此 transformCoreVS 处理的蒙皮、变形和实例化会自动工作。建议通过 #ifndef SHADOW_PASS 跳过光照等阴影不需要的工作,以提高速度。注意,matrix_normal 等部分引擎 uniform 在阴影通道不可用。
支持平行光全部阴影类型,以及聚光灯 PCF 阴影;不支持点光源阴影。
完整示例参见引擎示例浏览器中的 Shader Material Shadows。
拾取通道
要让 Picker 识别使用自定义着色器的网格,片元着色器必须在拾取通道输出网格实例 ID。定义 PICK_PASS 时,包含引擎的 pickPS,将 getPickOutput() 返回值写到输出颜色:
- GLSL
- WGSL
#ifdef PICK_PASS
    // Provides getPickOutput(), which returns the encoded ID of the mesh instance
    #include "pickPS"
#endif

void main(void)
{
    #ifdef PICK_PASS

        // output the mesh instance ID
        gl_FragColor = getPickOutput();

    #else

        // normal color rendering
        gl_FragColor = ...;

    #endif
}
#ifdef PICK_PASS
    // Provides getPickOutput(), which returns the encoded ID of the mesh instance
    #include "pickPS"
#endif

@fragment
fn fragmentMain(input: FragmentInput) -> FragmentOutput
{
    var output: FragmentOutput;

    #ifdef PICK_PASS

        // output the mesh instance ID
        output.color = getPickOutput();

    #else

        // normal color rendering
        output.color = ...;

    #endif

    return output;
}
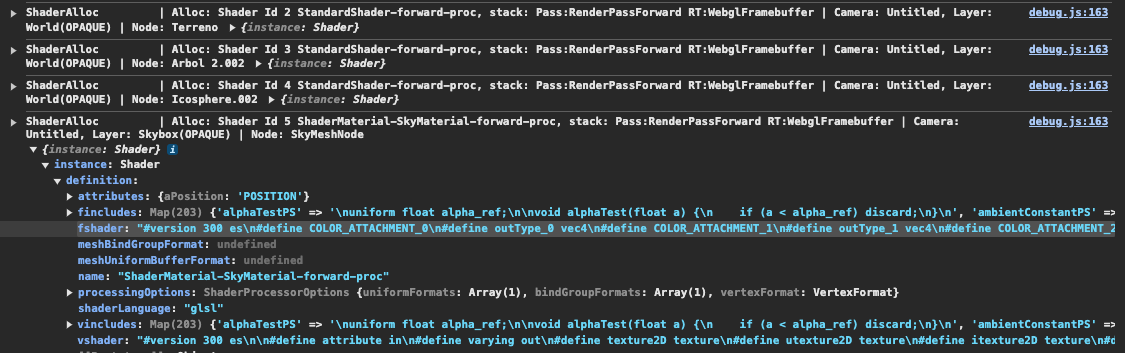
生成的着色器
需要检查生成的着色器时,可在脚本中添加:
pc.Tracing.set(pc.TRACEID_SHADER_ALLOC, true);
每个创建的着色器都会记录到浏览器控制台,可检查源码,例如:
更多信息参见 ShaderMaterial API 文档。