层级与变换
每个实体都有变换:位置、旋转和缩放。这些值相对于父实体,因此父实体移动、转动或变大时,子实体也会随之变化。这正是层级结构的作用:无论汽车开到哪里,车轮都留在车上;剑留在持有者手中;移动菜单面板时,整个菜单一起移动。
层级如何工作
下面的引擎应用通过五个实体构建了一个小型太阳系:
sun
earthOrbit          位于中心,缓慢自转
└── earth           沿父级 X 轴向外 6 个单位
    └── moonOrbit   位于地球中心,较快旋转
        └── moon    沿父级 X 轴向外 1.5 个单位
代码没有直接移动地球或月球。每帧只让两个轨道实体绕各自的 Y 轴旋转。地球相对于 earthOrbit 的位置固定,因此轨道旋转时会带着地球绕太阳运动。月球在层级中更深两层,既会被 moonOrbit 带着绕地球运动,也会被 earthOrbit 带着绕太阳运动。
import * as pc from 'playcanvas';

// create the application with the component systems it uses
const canvas = document.getElementById('application');
const device = await pc.createGraphicsDevice(canvas, {
    deviceTypes: [pc.DEVICETYPE_WEBGPU]
});
device.maxPixelRatio = Math.min(window.devicePixelRatio, 2);

const options = new pc.AppOptions();
options.graphicsDevice = device;
options.componentSystems = [
    pc.RenderComponentSystem,
    pc.CameraComponentSystem,
    pc.LightComponentSystem
];

const app = new pc.AppBase(canvas);
app.init(options);
app.setCanvasFillMode(pc.FILLMODE_FILL_WINDOW);
app.setCanvasResolution(pc.RESOLUTION_AUTO);
window.addEventListener('resize', () => app.resizeCanvas());
app.start();

app.scene.ambientLight = new pc.Color(0.1, 0.1, 0.12);

const camera = new pc.Entity('camera');
camera.addComponent('camera', {
    clearColor: new pc.Color(0.03, 0.04, 0.07)
});
camera.setPosition(0, 7, 12);
camera.lookAt(0, 0, 0);
app.root.addChild(camera);

// a sphere with a material of the given color, which glows if emissive is true
const createSphere = (name, color, emissive = false) => {
    const material = new pc.StandardMaterial();
    if (emissive) {
        material.diffuse = new pc.Color(0, 0, 0);
        material.emissive = color;
    } else {
        material.diffuse = color;
    }
    material.update();

    const entity = new pc.Entity(name);
    entity.addComponent('render', { type: 'sphere', material: material });
    return entity;
};

// the sun glows, and lights the planets with an omni light
const sun = createSphere('sun', new pc.Color(1, 0.75, 0.3), true);
sun.addComponent('light', { type: 'omni', range: 30, intensity: 2 });
sun.setLocalScale(2, 2, 2);
app.root.addChild(sun);

// the earth is a child of an orbit entity at the center
const earthOrbit = new pc.Entity('earthOrbit');
app.root.addChild(earthOrbit);

const earth = createSphere('earth', new pc.Color(0.2, 0.45, 1));
earth.setLocalPosition(6, 0, 0);
earthOrbit.addChild(earth);

// the moon is set up the same way, one level further down
const moonOrbit = new pc.Entity('moonOrbit');
earth.addChild(moonOrbit);

const moon = createSphere('moon', new pc.Color(0.75, 0.75, 0.75));
moon.setLocalPosition(1.5, 0, 0);
moon.setLocalScale(0.35, 0.35, 0.35);
moonOrbit.addChild(moon);

// every frame, turn the orbits around their own Y axes, in degrees per second
app.on('update', (dt) => {
    earthOrbit.rotateLocal(0, 20 * dt, 0);
    moonOrbit.rotateLocal(0, 90 * dt, 0);
});
可以尝试:
- 增大
90,让月球运动更快。 - 在创建
moonOrbit的代码后添加moonOrbit.setLocalEulerAngles(30, 0, 0);,让月球轨道倾斜。轨道仍绕自身 Y 轴旋转,只是该轴现在倾斜了。 - 使用
earth.setLocalScale(2, 2, 2);放大地球。月球位于地球的下级,因此也会放大,轨道尺寸也扩大到两倍。 - 添加自己的行星:复制创建
earthOrbit和earth的代码并改名,将新行星放在离太阳更远的位置,并在update处理函数中降低轨道旋转速度。
坐标系
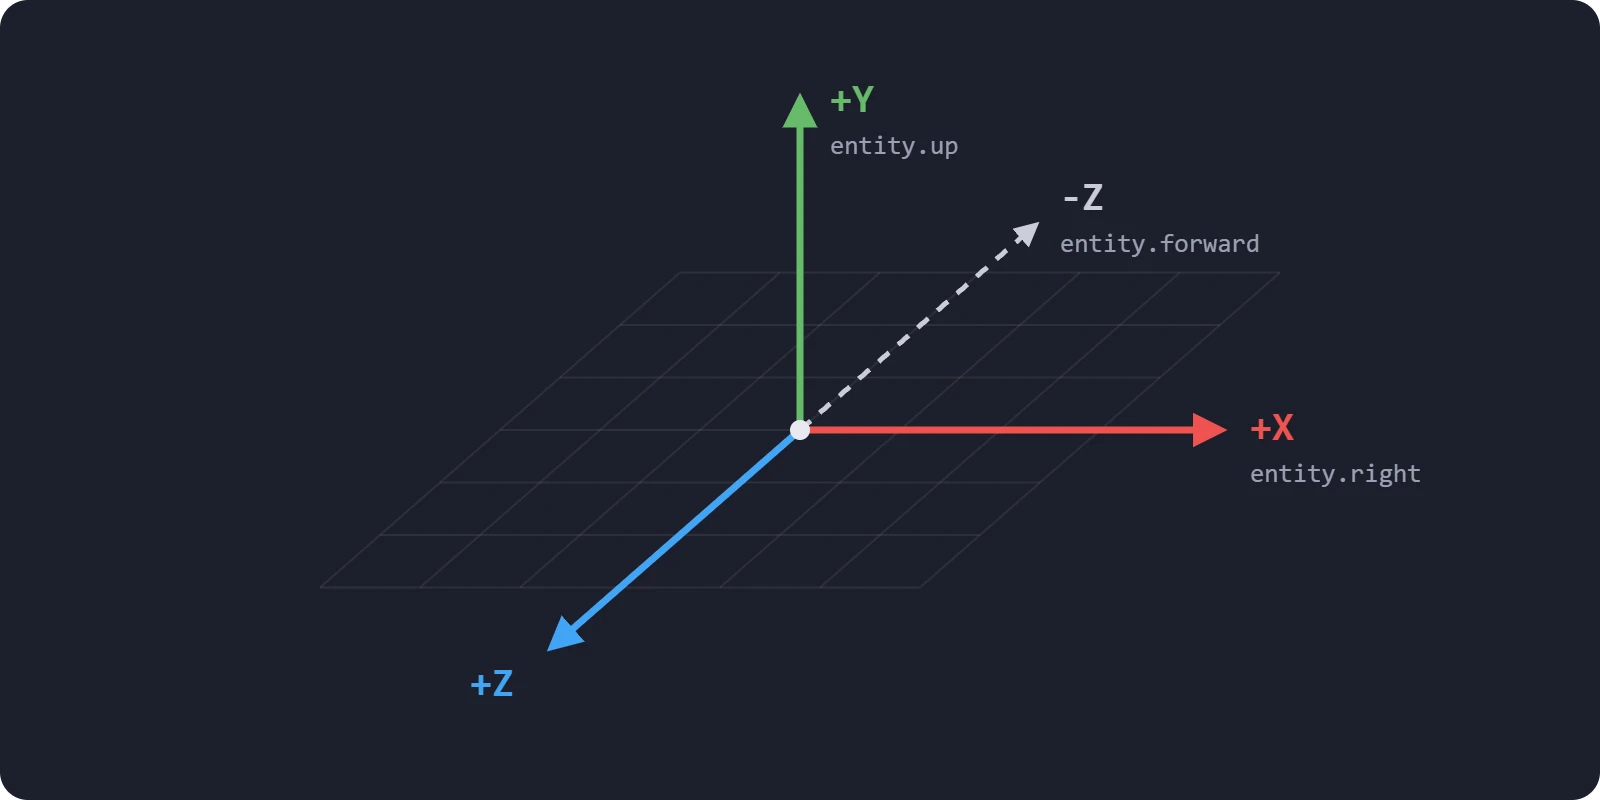
PlayCanvas 使用右手坐标系,+Y 为上方。在默认正面视图中,+X 向右,+Z 朝向观察者,即从屏幕向外。实体自身的前方为 -Z,相机朝这个方向观察,lookAt() 也将这个方向指向目标,因此代码中的向前移动就是沿 -Z 移动。
- 单位:按约定,一个单位对应一米。物理引擎以米为单位,基本立方体宽一个单位。
- 角度:欧拉角以度为单位,按 X、Y、Z 顺序应用。
- 方向:
forward、right和up返回实体的 -Z、+X 和 +Y 轴在世界空间中的方向,不受实体朝向变化的影响。
局部空间与世界空间
实体变换存储在相对于父实体的局部空间中。应用全部祖先变换后,得到实体在场景中的世界空间变换。对于直接位于 app.root 下的实体,两者相同。
引擎为两种空间都提供了方法。带 Local 的方法相对于父实体工作,其他方法使用世界空间:
| 局部空间 | 世界空间 | |
|---|---|---|
| 位置 | getLocalPosition()、setLocalPosition() | getPosition()、setPosition() |
| 欧拉角旋转 | getLocalEulerAngles()、setLocalEulerAngles() | getEulerAngles()、setEulerAngles() |
| 四元数旋转 | getLocalRotation()、setLocalRotation() | getRotation()、setRotation() |
| 缩放 | getLocalScale()、setLocalScale() | getScale(),只读 |
get 方法返回的向量和四元数属于实体,会随实体运动而变化。应视为只读;要保留数值或修改副本,请调用 clone()。世界缩放只能读取,并且只有不存在斜切时才可靠。层级上方的非均匀缩放与旋转结合可能产生斜切,参见缩放。
- 引擎
- 编辑器
- React
- Web Components
const car = new pc.Entity('car');
car.setPosition(10, 0, 0);
app.root.addChild(car);

const wheel = new pc.Entity('wheel');
car.addChild(wheel);
wheel.setLocalPosition(1, 0, 2); // relative to the car

console.log(wheel.getPosition().toString()); // [11, 0, 2]

wheel.setPosition(0, 0, 0); // the world origin
console.log(wheel.getLocalPosition().toString()); // [-10, 0, 0]
Inspector 中的 Position、Rotation 和 Scale 是相对于父实体的局部变换,旋转使用以度为单位的欧拉角。在视口中,工具栏的 World/Local 按钮可让操作器在世界轴和实体自身轴之间切换。
<Entity> 的 position、rotation 和 scale props 表示相对于外层 <Entity> 的局部变换,rotation 为以度为单位的欧拉角:
<Entity name="car" position={[10, 0, 0]}>
  <Entity name="wheel" position={[1, 0, 2]} rotation={[0, 0, 90]} />
</Entity>
要读取世界空间值,通过 ref 访问引擎实体,例如 ref.current.getPosition()。
<pc-entity> 的 position、rotation 和 scale 特性表示相对于外层 <pc-entity> 的局部变换,rotation 为以度为单位的欧拉角:
<pc-entity name="car" position="10 0 0">
    <pc-entity name="wheel" position="1 0 2" rotation="0 0 90"></pc-entity>
</pc-entity>
要读取世界空间值,使用引擎实体,例如 element.entity.getPosition()。
移动与旋转
设置位置或旋转会直接将实体置于新的状态。要从当前状态开始移动或转动,可使用:
translate()沿世界轴移动实体,translateLocal()沿自身轴移动,因此无论面向哪里,translateLocal(0, 0, -1)都会向前移动一个单位。rotate()绕世界轴旋转,rotateLocal()绕自身轴旋转。两者都接受以度为单位的欧拉角。lookAt()使实体的 -Z 轴指向指定位置。
要让移动速度不依赖帧率,将每帧位移乘以 dt,即距上一帧的时间,单位为秒。
不要读取欧拉角后直接累加。一个旋转可以有多种欧拉角表达,读取值可能与设置值不同:调用 setLocalEulerAngles(0, 120, 0) 后,getLocalEulerAngles() 返回 (180, 60, 180)。应在自己的变量中保存角度并每次设置,或使用 rotate() 和 rotateLocal()。
- 引擎
- 编辑器
- React
- Web Components
app.on('update', (dt) => {
    ship.translateLocal(0, 0, -5 * dt); // 5 units per second, forward
    ship.rotate(0, 45 * dt, 0);         // 45 degrees per second, around the world's Y axis
});
在脚本的 update 方法中移动实体:
import { Script } from 'playcanvas';

export class Fly extends Script {
    static scriptName = 'fly';

    update(dt) {
        this.entity.translateLocal(0, 0, -5 * dt);
        this.entity.rotate(0, 45 * dt, 0);
    }
}
通过 ref 逐帧移动引擎实体,而非改变 props,避免让 React 每帧重新渲染:
import { useRef } from 'react';
import { Entity } from '@playcanvas/react';
import { Render } from '@playcanvas/react/components';
import { useAppEvent } from '@playcanvas/react/hooks';

function Ship() {
  const ref = useRef(null);

  useAppEvent('update', (dt) => {
    ref.current.translateLocal(0, 0, -5 * dt);
    ref.current.rotate(0, 45 * dt, 0);
  });

  return (
    <Entity ref={ref} name="ship">
      <Render type="cone" />
    </Entity>
  );
}
也可以通过 <Script> 组件附加脚本。
在应用的 update 事件中逐帧移动引擎实体,或通过 <pc-script> 附加脚本:
<pc-entity name="ship">
    <pc-render type="cone"></pc-render>
</pc-entity>

<script type="module">
    import { whenReady } from '@playcanvas/web-components';

    const { app } = await whenReady('pc-app');
    const { entity } = await whenReady('pc-entity[name="ship"]');

    app.on('update', (dt) => {
        entity.translateLocal(0, 0, -5 * dt);
        entity.rotate(0, 45 * dt, 0);
    });
</script>
之后若设置实体的 position 或 rotation 特性,实体会恢复到该特性指定的变换。
动态刚体由物理引擎移动,会覆盖直接修改的变换。请通过力、冲量或传送移动,参见移动与传送。
父子关系
将实体添加到新父节点时,会从原父节点移除,并保留局部变换,因此它会跳到相对于新父节点的对应位置。若希望世界位置不变,先保存世界位置和旋转,调整父节点后再重新设置。
子实体通常按添加顺序排列,除非在指定索引处插入。对大多数实体没有影响,但用户界面元素会按层级顺序绘制,因此排列靠后的同级元素绘制在上方。
- 引擎
- 编辑器
- React
- Web Components
要将车轮移到拖车下并保留局部变换,直接将其添加为拖车的子实体。它会跳到相对于拖车、与原先相对于旧父节点相同的位置:
trailer.addChild(wheel);
若要保留世界变换,使其保持原位,先保存世界位置与旋转,调整后再重新设置:
const position = wheel.getPosition().clone();
const rotation = wheel.getRotation().clone();
trailer.addChild(wheel);
wheel.setPosition(position);
wheel.setRotation(rotation);
要在子列表开头而非末尾插入:
trailer.insertChild(spare, 0);
在层级面板中,将实体拖到另一个实体上,即可设为其子实体;拖到两个实体之间则移动排序。编辑器在调整父节点时默认保留世界变换,因此视口中位置不变;松开鼠标时按住 Ctrl(Mac 上为 Cmd),可改为保留局部变换。参见层级面板。
<Entity> 的父实体由其 JSX 中外层 <Entity> 决定。将其移动到另一个父节点,会让 React 卸载原组件并挂载新组件,因此对应引擎实体会被销毁,并在新父节点下重建。
<pc-entity> 的父实体由其外层 <pc-entity> 决定。将元素移到新父节点,会销毁原实体,并根据特性和子标签重建,因此通过代码对旧实体进行的修改会丢失。
缩放
缩放会影响实体下方的所有内容,包括子实体的位置和尺寸。整体放大模型时很有用,但只想改变其中一部分的形状时就可能带来问题。非均匀缩放尤其需要注意:它沿各轴的缩放程度不同,作用于已旋转的子实体时,不再沿子实体自身轴拉伸,因此可能产生斜切。
为控制缩放的影响范围,应将缩放放在负责绘制的叶实体上,再通过未缩放的父实体分组。例如,桌子可以由未缩放的 table 父实体组织,子实体分别为压扁的盒形桌面和四个细长盒形桌腿。
缩放也影响物理设置:基本几何碰撞形状会忽略实体缩放。参见碰撞形状。