图层与遮罩
anim 可以同时运行多个状态机,每个图层一个。各层有自己的状态、过渡和默认状态,共享组件参数。适合独立变化的同步动作:腿部行走、奔跑和跳跃,手臂瞄准射击,面部微笑眨眼。
每个组件有首个基础图层,后续按顺序叠在前面的结果上。权重决定贡献程度,混合类型决定组合方式,遮罩限制作用节点,例如仅驱动手臂,其余由下层处理。
添加图层
- 引擎
- 编辑器
- React
- Web Components
addLayer() 接受权重、遮罩和混合类型,返回新图层。通过图层自己的 assignAnimation() 添加状态:
const upperBody = character.anim.addLayer('UpperBody', 1, upperBodyMask, pc.ANIM_LAYER_OVERWRITE);
upperBody.assignAnimation('Aim', aimTrack);
upperBody.assignAnimation('Shoot', shootTrack, 1, false);
状态图数据也可包含多层。layers 各项除状态与过渡外,还包含 weight 和 blendType:
layers: [
    { name: 'Base', states: [/* ... */], transitions: [/* ... */] },
    { name: 'UpperBody', weight: 1, blendType: pc.ANIM_LAYER_OVERWRITE, states: [/* ... */], transitions: [/* ... */] }
]
用 findLayer() 按名称查找,或访问 layers 数组。
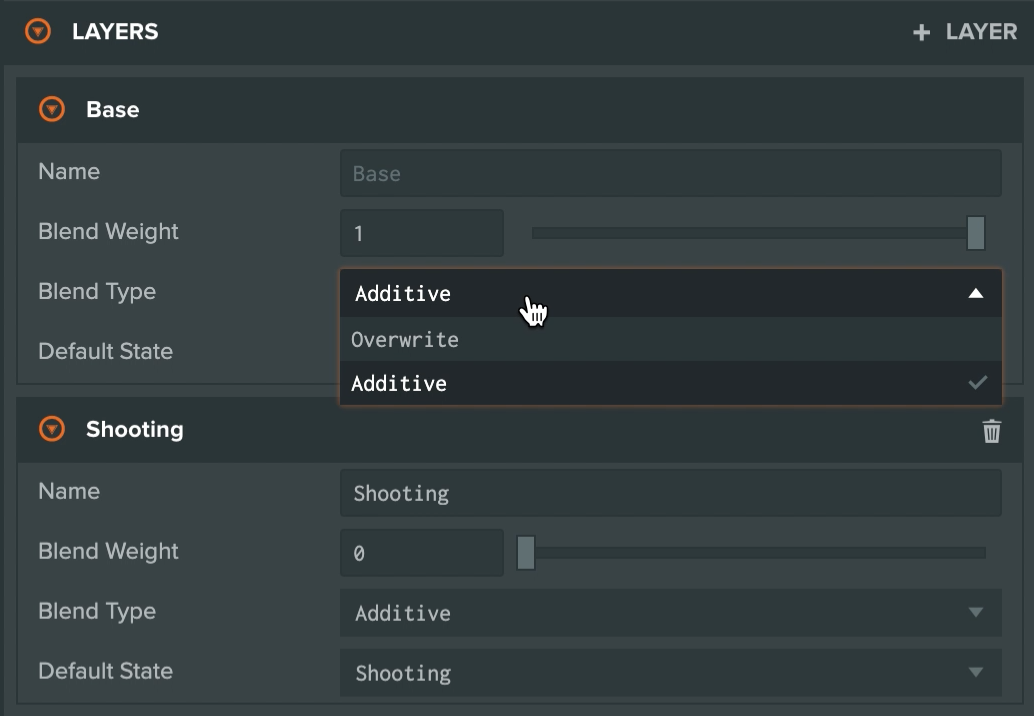
状态图资源初始包含不能删除的基础层。在图编辑器图层面板点击 + LAYER,设置 Name、Default State、Blend Type 和 Blend Weight。通过图右上角下拉框选择编辑的图层。
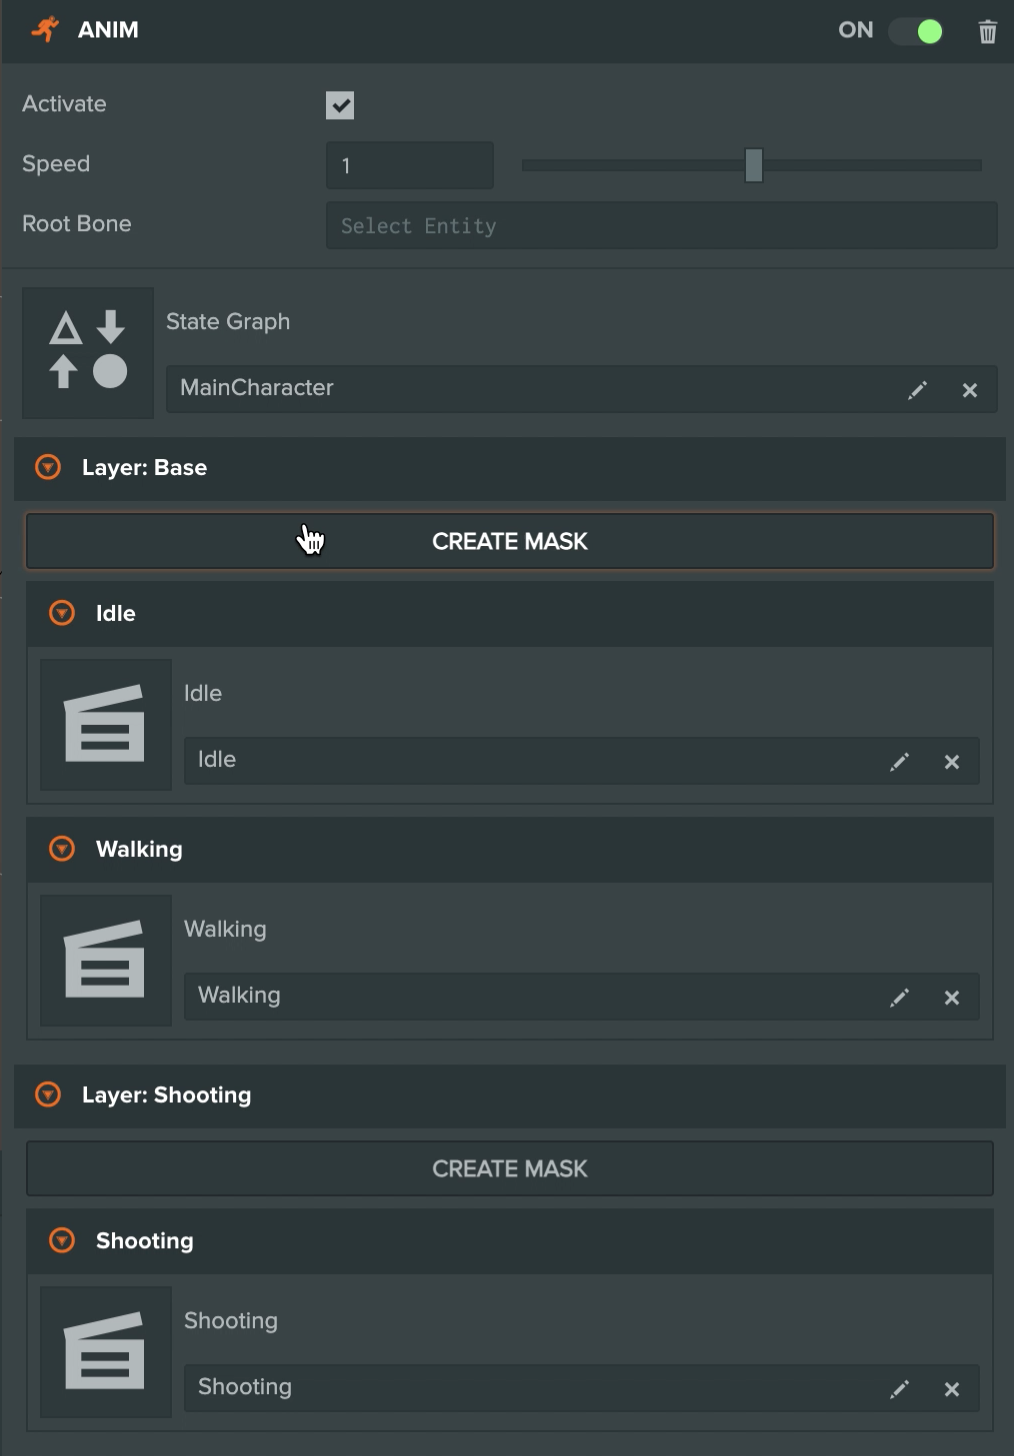
Anim 为每层显示独立区域,包含各状态的片段槽位。
在模型 <Entity> 内、<Anim playing /> 后,通过自己的组件向引擎组件添加图层:
import { useEffect } from 'react';
import { useParent } from '@playcanvas/react/hooks';

function UpperBody({ tracks }) {
  const entity = useParent();

  useEffect(() => {
    const layer = entity.anim.addLayer('UpperBody', 1, upperBodyMask);
    layer.assignAnimation('Aim', tracks.aim);
  }, [entity, tracks]);

  return null;
}
权重与混合类型
权重范围为 0 到 1,0 表示无影响,中间值的行为取决于混合类型:
- Overwrite(
pc.ANIM_LAYER_OVERWRITE)为默认,按权重从下层结果混合到本层姿态。1 完全替换,0.5 各占一半。基础层与模型原始姿态也这样混合,因此基础层权重 0.5 表示半强度播放。 - Additive(
pc.ANIM_LAYER_ADDITIVE)将片段相对于模型原始姿态的差值,乘以权重后加到下层结果。适合在瞄准上加后坐力,或在任意姿态上加呼吸。
可随时修改 weight。平滑淡入淡出使用 blendToWeight(),在指定秒数内变化到目标权重:
const upperBody = character.anim.findLayer('UpperBody');
upperBody.blendToWeight(1, 0.3); // fade in over 0.3 seconds
upperBody.blendToWeight(0, 0.3); // and out again
Normalize Weights(normalizeWeights)改变组合方式。启用后,作用于同一节点的层按权重总和归一化,使原始姿态不再透出。独占节点的层不论权重都全强度播放,覆盖层会替换节点上的全部下层,叠加层则与下层混合而非相加。除非需要这些行为,建议关闭。编辑器会为此选项出现前创建的旧组件启用,以保持兼容。
遮罩
遮罩列出本层驱动的节点。未列出的节点交给下层,仿佛此层不存在;没有遮罩则驱动片段中的全部目标。
- 引擎
- 编辑器
- React
- Web Components
遮罩是以节点路径为键的对象。路径从 anim 实体,或设置的 Root Bone 开始,按名称用 / 分隔,包含起始实体名,与片段曲线路径一致。值 true 包含该节点,{ children: true } 包含节点及全部后代。下面组件位于名为 Root 的实体:
upperBody.mask = {
    // the upper spine and everything below it, such as the arms and head
    'Root/Hips/Spine/Spine1': { children: true },
    // the lower spine, without its children
    'Root/Hips/Spine': true
};
将遮罩作为 addLayer() 第三个参数,或之后设置图层 mask。设为 null 移除。
遮罩属于各实体的 Anim,而非状态图资源,因此同一图可在不同模型上使用不同遮罩。
-
选中实体,在 Anim 对应图层区域点击 CREATE MASK。
-
遮罩检查器从 Root Bone 显示动画层级,勾选本层需要驱动的节点。右键选择 Add hierarchy 或 Remove hierarchy,一次选择或取消整棵子树。
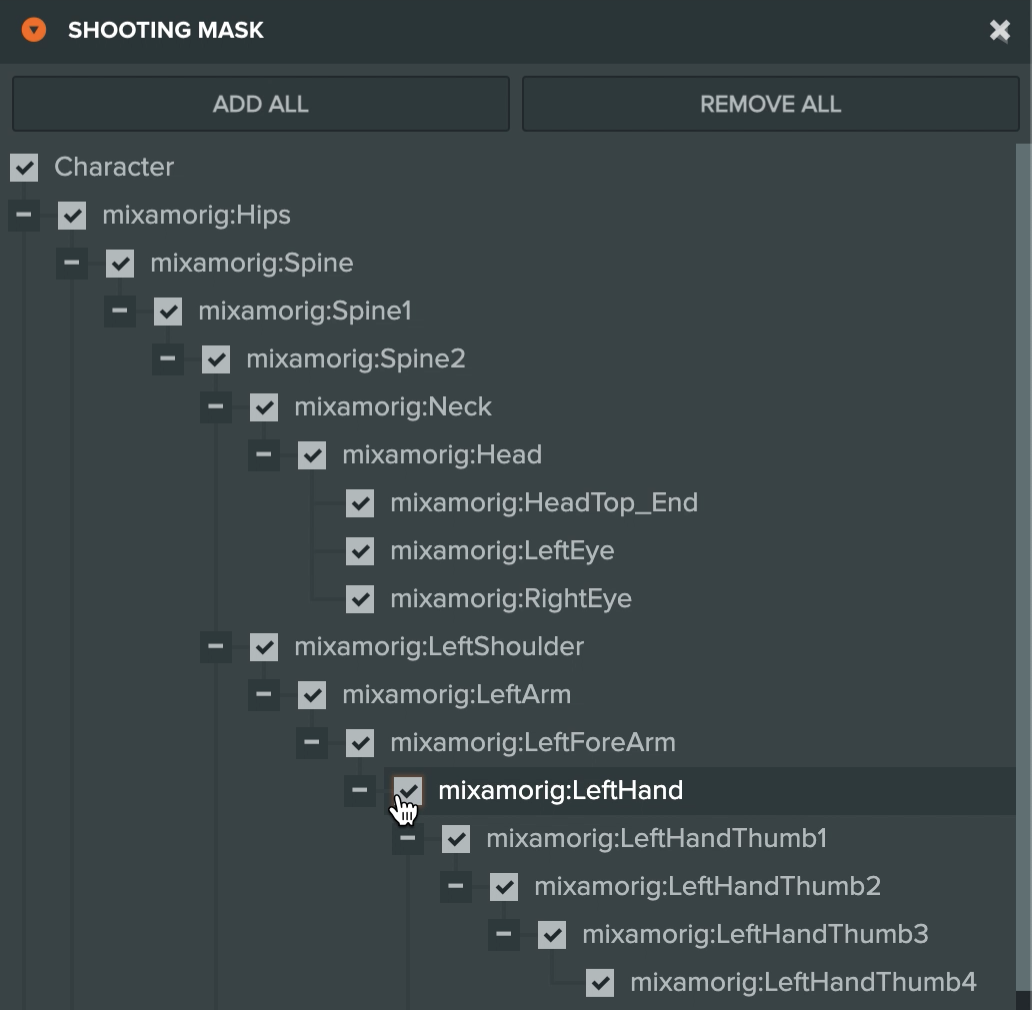
之后点击 EDIT MASK 修改,旁边删除按钮用于移除。
从自定义组件向 addLayer() 传入遮罩,或设置 mask,与引擎标签页相同。
对代码添加的组件使用 addLayer() 或 mask,与引擎标签页相同。
示例
机械臂基础层待机,第二层播放 inspect。第二层遮罩只包含手腕和下级关节,其余继续待机。点击画布通过 blendToWeight() 淡入淡出。
import * as pc from 'playcanvas';

// create the application with the component systems and resource handlers it uses
const canvas = document.getElementById('application');
const device = await pc.createGraphicsDevice(canvas, {
    deviceTypes: [pc.DEVICETYPE_WEBGPU]
});
device.maxPixelRatio = Math.min(window.devicePixelRatio, 2);

const options = new pc.AppOptions();
options.graphicsDevice = device;
options.componentSystems = [
    pc.RenderComponentSystem,
    pc.CameraComponentSystem,
    pc.LightComponentSystem,
    pc.AnimComponentSystem
];
options.resourceHandlers = [pc.ContainerHandler, pc.TextureHandler];

const app = new pc.AppBase(canvas);
app.init(options);
app.setCanvasFillMode(pc.FILLMODE_FILL_WINDOW);
app.setCanvasResolution(pc.RESOLUTION_AUTO);
window.addEventListener('resize', () => app.resizeCanvas());
app.start();

app.scene.ambientLight = new pc.Color(0.35, 0.35, 0.4);

// load the robot arm, a GLB with five animations
const asset = new pc.Asset('robot-arm', 'container', {
    url: 'https://developer.playcanvas.com/assets/robot-arm.glb'
});
await new Promise((resolve) => {
    asset.ready(resolve);
    app.assets.add(asset);
    app.assets.load(asset);
});

const camera = new pc.Entity('camera');
camera.addComponent('camera', {
    clearColor: new pc.Color(0.11, 0.12, 0.17)
});
camera.setPosition(1.75, 1.4, 2.15);
camera.lookAt(0, 0.75, 0);
app.root.addChild(camera);

const light = new pc.Entity('light');
light.addComponent('light', {
    castShadows: true,
    shadowBias: 0.2,
    normalOffsetBias: 0.05
});
light.setEulerAngles(48, 38, 0);
app.root.addChild(light);

const floor = new pc.Entity('floor');
const floorMaterial = new pc.StandardMaterial();
floorMaterial.diffuse = new pc.Color(0.24, 0.26, 0.31);
floorMaterial.update();
floor.addComponent('render', { type: 'plane', material: floorMaterial });
floor.setLocalScale(20, 1, 20);
app.root.addChild(floor);

// create the arm's entities, and give its root an anim component
const arm = asset.resource.instantiateRenderEntity({ castShadows: true });
arm.addComponent('anim', { activate: true });
app.root.addChild(arm);

const tracks = Object.fromEntries(asset.resource.animations.map(animation => [animation.resource.name, animation.resource]));

// the base layer idles the whole arm
arm.anim.assignAnimation('Idle', tracks.idle);

// a second layer, masked to the wrist and everything below it, plays inspect at a weight of 0
const wrist = arm.anim.addLayer('Wrist', 0, {
    'arm_base/arm_column/arm_upper/arm_forearm/arm_wrist_roll': { children: true }
}, pc.ANIM_LAYER_OVERWRITE);
wrist.assignAnimation('Inspect', tracks.inspect);

// click to blend the wrist layer in or out over half a second
let on = false;
canvas.addEventListener('click', () => {
    on = !on;
    wrist.blendToWeight(on ? 1 : 0, 0.5);
});

const label = document.createElement('div');
label.style.cssText = 'position: absolute; left: 12px; bottom: 10px; color: #ccc; font: 14px sans-serif;';
document.body.appendChild(label);
app.on('update', () => {
    label.textContent = `Wrist layer weight: ${wrist.weight.toFixed(2)}. Click to blend it in or out.`;
});
可以尝试:
- 将遮罩上移到
'arm_base/arm_column/arm_upper',同时影响上臂与前臂。 - 用
null替换遮罩,整条机械臂参与 inspect。 - 将
pc.ANIM_LAYER_OVERWRITE改为pc.ANIM_LAYER_ADDITIVE,在待机上叠加检查动作,而非替换。
Layer Masks 示例在全身层上播放上半身层。示例浏览器控制面板可切换各层状态、上半身混合类型、遮罩和贡献权重:
另请参阅
- 状态图:各层的状态和过渡。
- Anim 组件:组件、图层与遮罩的编辑器参考。
- AnimComponent 和 AnimComponentLayer:引擎 API。