动画片段
动画片段是一组具有名称和时长的曲线。各曲线保存指定时刻的关键帧值,以及驱动的属性:节点位置、旋转、缩放、变形目标权重或组件属性。播放时在关键帧间插值,因此只需在运动变化处设置关键帧。引擎中片段是 AnimTrack。
模型中的片段
多数动画随模型提供。GLB 或 glTF 可包含任意数量的具名动画,加载模型后,每个动画对应一个片段。
- 引擎
- 编辑器
- React
- Web Components
以 container 资源加载文件,其运行时资源的 animations 数组包含动画资源,每个资源的 resource 是以动画名称命名的片段:
const asset = new pc.Asset('robot-arm', 'container', {
    url: 'https://developer.playcanvas.com/assets/robot-arm.glb'
});
asset.ready(() => {
    for (const animation of asset.resource.animations) {
        const track = animation.resource;
        console.log(track.name, track.duration); // idle 4.03, pick 5.03, ...
    }
});
app.assets.add(asset);
app.assets.load(asset);
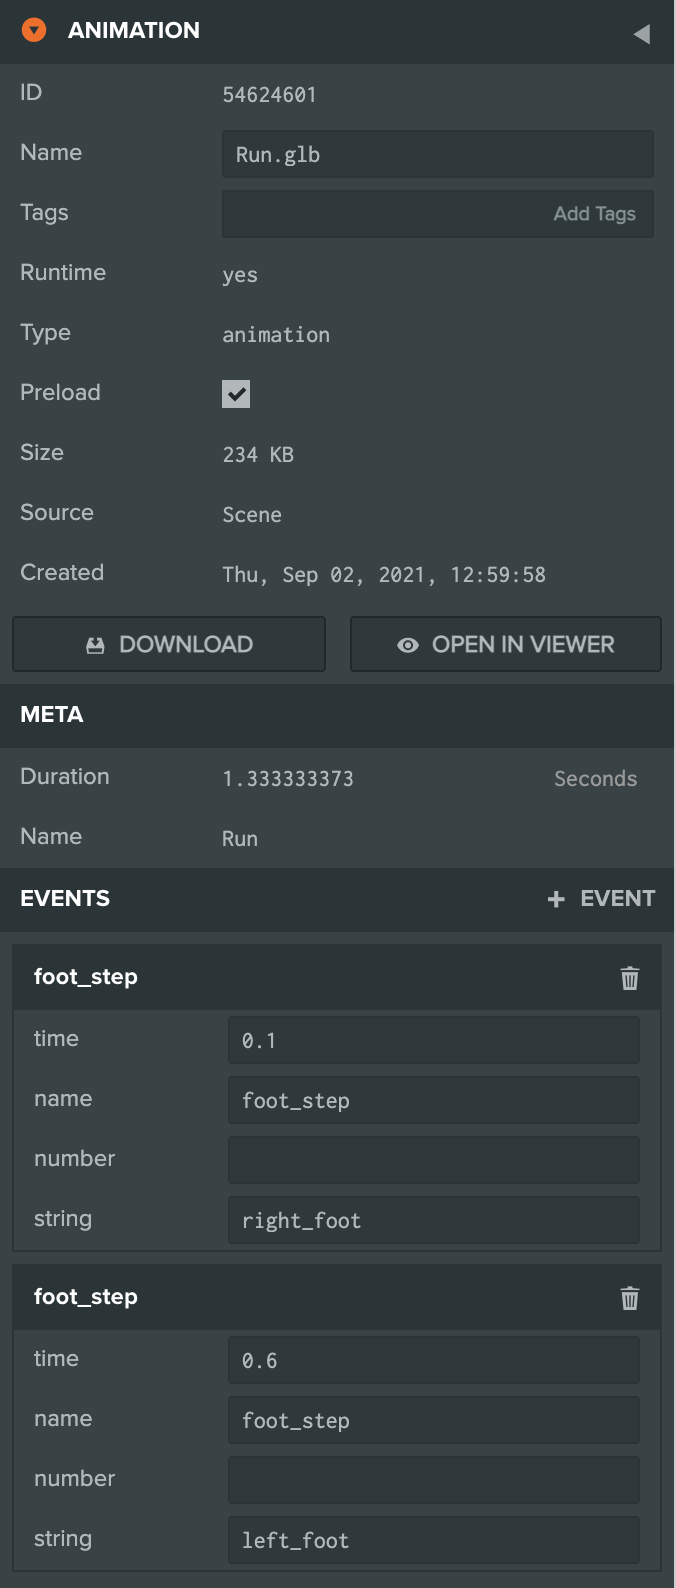
向资源面板上传 GLB 或 FBX,编辑器会在模型旁为各动画生成 Animation 资源。资源导入设置启用 Convert to GLB 时,FBX 导入后转为 GLB;同一设置中也可控制动画命名和采样。
选中动画资源,在 Inspector 查看名称和时长,并可在模型上预览。
useModel() 将 GLB 加载为 container,其运行时资源中包含片段:
import { useModel } from '@playcanvas/react/hooks';

const { asset } = useModel('https://developer.playcanvas.com/assets/robot-arm.glb');
const tracks = asset?.resource.animations.map(animation => animation.resource);
<pc-asset> 加载文件,模型 <pc-anim> 内的 <pc-anim-clip> 按名称选择片段。设置 asset 可改为从其他文件取片段:
<pc-asset id="robot-arm" src="https://developer.playcanvas.com/assets/robot-arm.glb"></pc-asset>
<pc-asset id="calibrate" src="https://developer.playcanvas.com/assets/robot-arm-calibrate.glb" type="animation"></pc-asset>
<pc-scene>
    <pc-model asset="robot-arm">
        <pc-anim clip="calibrate">
            <pc-anim-clip name="idle"></pc-anim-clip>
            <pc-anim-clip name="calibrate" asset="calibrate"></pc-anim-clip>
        </pc-anim>
    </pc-model>
</pc-scene>
片段如何绑定
片段不保存实体引用。各曲线通过路径指定目标,从动画层级根节点到目标的各节点名称组成。片段分配给 anim 后,组件在实体后代中查找路径;设置 Root Bone(rootBone)时,从该节点开始。找不到目标的曲线会被忽略。
因此:
- **一个片段可驱动多个模型。**节点名称一致的模型都能播放,同一骨架构建的角色可共享一组动画。
- **片段可以单独保存。**只包含动画而无网格的 GLB 较小,像普通 container 一样加载,再将片段分配给模型组件。
- **绑定发生在分配时。**模型较晚加载等情况导致节点之后才加入层级时,调用
entity.anim.rebind()重新查找;Web Components 会自动处理。
// play a clip from an animation-only GLB on a model whose nodes have the same names
const walk = walkAsset.resource.animations[0].resource;
character.anim.assignAnimation('Walk', walk);
通过代码创建片段
可从关键帧创建片段,驱动不是来自模型的实体,或模型没有提供动画的属性。片段由三类对象组成:
AnimData:保存扁平数值数组及每个值的分量数。时间一个分量,位置三个,四元数旋转四个。AnimCurve:连接时间与数值,指定目标属性及插值方式:pc.INTERPOLATION_STEP、pc.INTERPOLATION_LINEAR或pc.INTERPOLATION_CUBIC。AnimTrack:片段本身,包含名称、时长、时间、数值和曲线。
曲线路径有三部分。entityPath 从 anim 所属实体名称开始,逐级列出到目标的实体名;component 为变换使用的 graph,或具体组件名;propertyPath 为属性路径,例如变换的 localPosition、localRotation、localScale,或灯光的 intensity、color。
import * as pc from 'playcanvas';

// create the application with the component systems it uses
const canvas = document.getElementById('application');
const device = await pc.createGraphicsDevice(canvas, {
    deviceTypes: [pc.DEVICETYPE_WEBGPU]
});
device.maxPixelRatio = Math.min(window.devicePixelRatio, 2);

const options = new pc.AppOptions();
options.graphicsDevice = device;
options.componentSystems = [
    pc.RenderComponentSystem,
    pc.CameraComponentSystem,
    pc.LightComponentSystem,
    pc.AnimComponentSystem
];

const app = new pc.AppBase(canvas);
app.init(options);
app.setCanvasFillMode(pc.FILLMODE_FILL_WINDOW);
app.setCanvasResolution(pc.RESOLUTION_AUTO);
window.addEventListener('resize', () => app.resizeCanvas());
app.start();

app.scene.ambientLight = new pc.Color(0.1, 0.1, 0.12);

const camera = new pc.Entity('camera');
camera.addComponent('camera', {
    clearColor: new pc.Color(0.05, 0.06, 0.09)
});
camera.setPosition(0, 2, 5);
camera.lookAt(0, 0.8, 0);
app.root.addChild(camera);

const floorMaterial = new pc.StandardMaterial();
floorMaterial.diffuse = new pc.Color(0.5, 0.5, 0.55);
floorMaterial.update();

const floor = new pc.Entity('floor');
floor.addComponent('render', { type: 'plane', material: floorMaterial });
floor.setLocalScale(20, 1, 20);
app.root.addChild(floor);

// the beacon is the root of the hierarchy that the clip animates: a glowing cube,
// with an omni light inside it
const beacon = new pc.Entity('beacon');
app.root.addChild(beacon);

const glow = new pc.StandardMaterial();
glow.emissive = new pc.Color(1, 0.55, 0.2);
glow.update();

const cube = new pc.Entity('cube');
cube.addComponent('render', { type: 'box', material: glow, castShadows: false });
beacon.addChild(cube);

const lamp = new pc.Entity('lamp');
lamp.addComponent('light', { type: 'omni', color: new pc.Color(1, 0.55, 0.2), range: 6 });
cube.addChild(lamp);

// the keyframe times, in seconds, and two sets of values at those times
const times = new pc.AnimData(1, [0, 0.5, 1]);
const positions = new pc.AnimData(3, [0, 0.4, 0, 0, 1.6, 0, 0, 0.4, 0]);
const intensities = new pc.AnimData(1, [0.5, 3, 0.5]);

// each curve links the times to one set of values, and names the property it drives
const curves = [
    new pc.AnimCurve([{ entityPath: ['beacon', 'cube'], component: 'graph', propertyPath: ['localPosition'] }], 0, 0, pc.INTERPOLATION_LINEAR),
    new pc.AnimCurve([{ entityPath: ['beacon', 'cube', 'lamp'], component: 'light', propertyPath: ['intensity'] }], 0, 1, pc.INTERPOLATION_LINEAR)
];
const track = new pc.AnimTrack('bob', 1, [times], [positions, intensities], curves);

// play the clip on the beacon
beacon.addComponent('anim', { activate: true });
beacon.anim.assignAnimation('bob', track);
可以尝试:
- 将首尾高度从
0.4改为-0.5,让立方体沉入地面。 - 添加关键帧:在时间末尾加入
2,位置末尾增加三个数,强度增加一个数,将片段时长改为2。 - 将
pc.INTERPOLATION_LINEAR改为pc.INTERPOLATION_STEP,数值会在关键帧间跳变,而非连续插值。
Component Properties 示例通过代码创建两个片段,驱动两盏聚光灯的颜色与旋转。在示例浏览器控制面板点击 Flash,从稳定绿色交叉淡化到闪烁红色,再次点击恢复: