用户界面:进度条
使用 Element 组件创建的进度条。查看完整场景。
使用内置 Element 可以轻松创建进度条。本教程中的进度条每隔几秒就从空到满循环一次。
层级
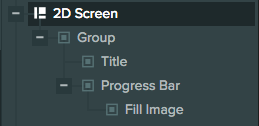
界面层级如下:
屏幕配置
屏幕配置如下:
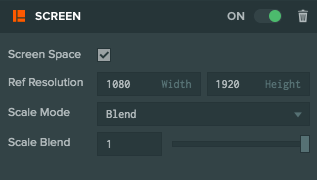
由于这是二维屏幕,我们勾选 Screen Space(屏幕空间)。Reference Resolution(参考分辨率)设为目标分辨率,本例为 1080 × 1920。Scale Mode(缩放模式)选择 Blend,使屏幕适应分辨率变化;Scale Blend(缩放混合)设为 1,使屏幕只根据高度变化缩放。
屏幕的子级包括显示 POWER 文字的 Text 元素,以及显示进度条的 Progress Bar 实体。
进度条配置
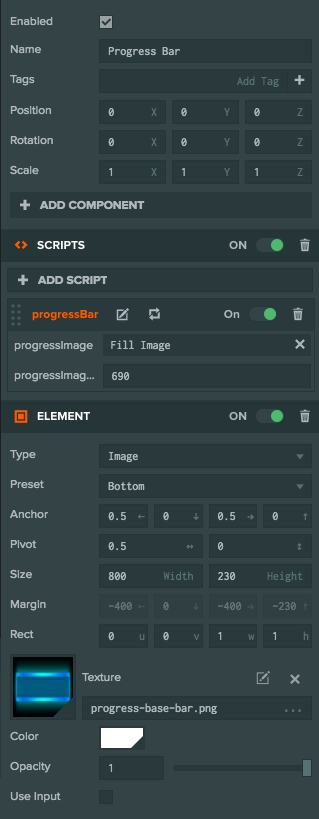
进度条由背景图像与填充图像两个元素组成。
示例中的 Progress Bar 实体是背景,具有 Image 元素,用于显示进度条背景图像:
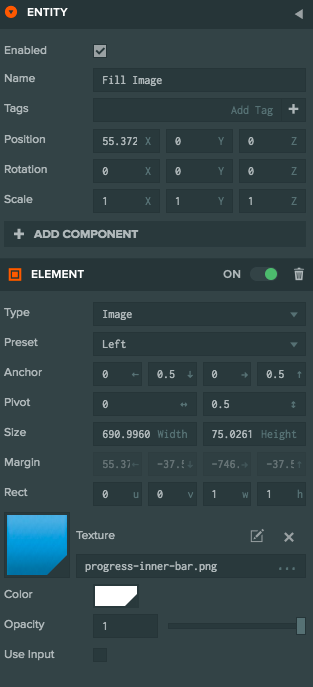
Fill Image 实体是 Progress Bar 的子级,使用 Image 元素显示填充部分。它锚定在父级背景的左侧,因此可以通过修改元素宽度使进度条增长。
脚本
Progress Bar 实体的脚本控制进度条尺寸变化:
- ESM
- 传统脚本
import { Script, math, Entity } from 'playcanvas';

export class ProgressBar extends Script {
    static scriptName = "progressBar";

   /**
     * @attribute
     * @title Progress Image
     * @type {Entity}
     */
    progressImage = null;

    /**
     * @attribute
     * @title Progress Image Max Width
     * @type {number}
     */
    progressImageMaxWidth = null;

    initialize() {
        // use our own rect object to set the size of
        // the progress bar
        this.imageRect = this.progressImage.element.rect.clone();

        // initialize progress to 0
        this.setProgress(0);
        // if true the progress bar will increase
        // otherwise it will decrease in update
        this.increase = true;
    }

    setProgress(value) {
        // clamp value between 0 and 1
        value = math.clamp(value, 0, 1);

        this.progress = value;

        // find the desired width of our progress fill image
        var width = math.lerp(0, this.progressImageMaxWidth, value);
        // set the width of the fill image element
        this.progressImage.element.width = width;

        // Set the width of the element's rect (rect.z) to be the same
        // value as our 0-1 progress.
        // This is so that the fill image will only show the portion
        // of the texture that is visible
        this.imageRect.copy(this.progressImage.element.rect);
        this.imageRect.z = value;
        // force rect update
        this.progressImage.element.rect = this.progressImage.element.rect;
    }

    // Increase or decrease the progress automatically
    update(dt) {
        const diff = this.increase ? dt : -dt;
        this.setProgress(this.progress + diff);

        if (this.progress >= 1)
            this.increase = false;
        else if (this.progress <= 0)
            this.increase = true;
    }
}
var ProgressBar = pc.createScript('progressBar');

// The entity that shows the fill image
ProgressBar.attributes.add('progressImage', {type: 'entity'});
// The maximum width of the fill image
ProgressBar.attributes.add('progressImageMaxWidth', {type: 'number'});

ProgressBar.prototype.initialize = function() {
    // use our own rect object to set the size of
    // the progress bar
    this.imageRect = this.progressImage.element.rect.clone();

    // initialize progress to 0
    this.setProgress(0);
    // if true the progress bar will increase
    // otherwise it will decrease in update
    this.increase = true;
};

// Set progress - value is between 0 and 1
ProgressBar.prototype.setProgress = function (value) {
    // clamp value between 0 and 1
    value = pc.math.clamp(value, 0, 1);

    this.progress = value;

    // find the desired width of our progress fill image
    var width = pc.math.lerp(0, this.progressImageMaxWidth, value);
    // set the width of the fill image element
    this.progressImage.element.width = width;

    // Set the width of the element's rect (rect.z) to be the same
    // value as our 0-1 progress.
    // This is so that the fill image will only show the portion
    // of the texture that is visible
    this.imageRect.copy(this.progressImage.element.rect);
    this.imageRect.z = value;
    // force rect update
    this.progressImage.element.rect = this.progressImage.element.rect;
};

// Increase or decrease the progress automatically
ProgressBar.prototype.update = function(dt) {
    var diff = this.increase ? dt : -dt;
    this.setProgress(this.progress + diff);

    if (this.progress >= 1)
        this.increase = false;
    else if (this.progress <= 0)
        this.increase = true;
};
脚本有两个属性:显示填充图像的实体,以及该图像的最大宽度。setProgress 函数将进度设置为 0 到 1 之间的值。
update 方法让进度在 0 和 1 之间循环。关键在于,要同时修改填充图像的 width 和 rect,才能正确调整进度条。
修改 width 使填充图像变宽,修改 rect 则确保只显示纹理应当可见的部分,避免拉伸纹理。rect 的 API 参考见此处。